R E C O V E R PT1.
- s o u l p u r p o s e

- Apr 25, 2020
- 13 min read
When we get sick the most important thing is recovery. Rushing back to early into every day life can be detrimental and put us back to bed, or back in the doctors waiting room.
The recovery process is a time to look inward, understand what it means to take care of ourself and really listen to our bodies - pretty much the fundementals of yoga.
As an asthmatic I have used yoga and yogic breath techiniques to control and manage my diesease for many years so now with the Covid-19 pandemic taking a hold of many of you, affecting your ability to breathe here are a few simple yoga poses that will help open your chest and expand your airways increasing lung capacity and broadening your inhale allowing more oxygen to enter your body...
This blog post is dedicated to a very special friend of mine in recovery from Covid-19. Someone fit, active and full of life and love for everybody. An extremely healthy and health/ mental health conscious person that has been hit quite hard by the virus. I hope this helps in some way with your recovery, and maybe help others who are struggling to breathe due to respiratory issues, stress and or anxiety... Sending all my L O V E to ALL <3
POSES TO OPEN THE CHEST & PROMOTE A DEEPER MORE CONNECTED BREATH
ASANA VIDEOS TO FOLLOW
A S A N A

1. CHILD'S POSE: Balasana
Don't under estimate the powers of this pose. Yes we use it as a resting or resorative break in our practice but Child's pose is the perfect calming position to centre yourself, take your attention inward and really notice your breath.
Sitting back on your haunches (pop a pilliow under your knees or sandwitched between your calves and butt for comfort if needed)
Lengthen through your spine to reach fingertips towards the to of your mat. Inhale lengthen, exhale relax and surrender to the mat.
Stay here for a few minutes breathing into the back chesk, opening the ribcase to allow the expansion of the lungs.
PROGRESSIONS/ MODIFICATIONS: Walk the hands and torso to the right, empasasing the reach of the left arm to feel that movement in the left body. Do the same to the left. Keep knees & hips square.


2. BABY COBRA / COBRA: Bhujangasana
A fantastic stretch to open the chest and shoulders, also a lovely pose to work and focus the breath.
Contary to common belief, a backbend is not to stretch out the back (you are compressing the back) it is to stretch and open the front body. Cobra / Baby Cobra also works the biceps, hip flexors, wrists, glutes, abdominals and feet.
Lay on your front, open the legs slightly to ensure no stress on the back.
Tops of feet, knees and thighs to the floor, no turn out of the hips.
Place hands (fingers forward) next to your chest wuith elbow tight to the body.
Press hands into the mat o your INHALE gently lifting the chest, keeping neck in-line with spine.
Feel a sense of the crown of the head lifting toward the sky and someone pulling your feet to elongate your legs. You should fel your butt start to work.
Repeate this 10 rounds - INHALE to push up, EXHALE to relax back to the mat. 1 round is an inhale / exhale.
MOVE WITH YOUR BREATH - so keep lifting for your full breath in (even if it is a sense of lengthening) and slow down your release with your exhale to relax.
Allow every muscle to relax.
ERach round try to make your inhale longer/ deeper and your exhale slower and more controlled.
PROGRESSIONS/MODIFICATIONS:
1) Lifting your hans to bring your arms into a cactus removes the resistance of the floor to work your back and butt muscles more - it also helps you exaggerate your breath as you naturally breath in deeper to lift yourself.
2) Lift your hips, thighs and knees off of the mat to come into upward-facing dog (traditional) for a longer lift.
3) Tuck your toes under to push into upward-facing dog on the balls of the feet, to give the arms a little bit more.

3. BOW POSE: Dhanurasana
This pose you need to be careful of. Pictured is the full version. I will talk you through how to get there but please take particular notice of the MODIFICATIONS section.
Laying on your front stretch yur fingertips to the top and lengthen your toes to the bottom of your mat.
Really feel the whole body lengthening. INHALE lengthen, EXHALE relax. Repeat that for 4 rounds (inhale/exhale = 1 round)
Bend you right kneed taking your right foot towards your butt. squeeze, feel the contraction of tthe hamstring. Release and repeate on the left.
Do the same again but this time bending both knees, taking both feet towards the butt.
Inhale and lift the chest reaching back with your arms towards your feet.
If you have access to your ankles, take hold and press them into your palms, push your chest forward and shoulders down. Feel the bredth in your chest.
Take 5 rounds of breth in this pose and on an exhale relax. Repeat this 5-10 rounds.
PROGRESSIONS/MODIFICATIONS:
1)
Instead of taking both legs, take one at a time.
Reach the left arm out in front of you as you take the right had to your ankle.
Maybe you press the ankle into the hand to create an arch in your back, but maybe you don't and you just grip the ankle and gently lift the extended arm and your chest from the mat as you inhale. - repeat 5-10 time each side.
2)
Bending both knees, reach the arms infront of you to the top of your mat and swim them round to reach back.
Instead of taking your ankles, reach to the back of the room with your fingertips as you lift your chect from the floor and presh your shoulders down.
Inhale feel the crown of your head lift, chest expand and arms lengthen behind you ad you bend your knees and press your feet towards your butt.
Exhale to relax.
Inhale to lift/ exhale to relax. Repeat 5-10 rounds.

4. CAMEL / MODIFIED CAMEL: Ustrasana
Similar to the previous 'BOW POSE', please be careful and go through the progressions and modifications. This full pose is not for everyone and should be built up to so I will explain the steps to get to the full pose through the the modifications...
Come to your knees (cushion or rolled towel under the knees if there is discomfort)
Hands to the small of your back, elbows pointing back - feel the chest broaden.
On an INHALE, lengthen through your spine, feel taller and lighter on your knees.
Gently press into your lower back to bend the spine slightly, moving with your inhale.
Once as arched as you are comfortable with, engage your abdominals (belly button to spine) and push your hips forward.
Take 5 big rounds of breath.
On an exhale slowly come back up to your starting position.
Come to Child's pose and repate 5 times.
PROGRESSIONS/MODIFICATIONS:
1) Working to full Camel
Reach back with one hand to the ankle (or block/ pile of books)
Press hips forward and reach the other hand to the sky to open the chest and create space.
Engage the abs and glutes.
Hold each side for 5-10 beaths.
2) Full Camel
Come to your knees and take your ankles in your hands.
Inhale, press into your shins, squeezing your skapulars together (shoulder blades) push up into a high kneeling
Keep neck inline with spin.
Hold for 5-10 breaths. Make each inhale a little bit deeper, drawing the breath intowards the belly.

5. BRIDGE POSE: Setu Bandhasana
A really great pose for so many reasons not only for lifting your heart and open your chest. Bridge pose can offer variey levels of intensity with just a few minor modifications, It is a all rounder in that it strentches, tones, strengthens and works the breath - OK all yoga asana does this, but Bridge pose for me (anyway) just feels like its doing something everywhere in that moment.
Start on your mat laying on your back.
Find your 'happy back' - Bend your knees so feet are flat to the ground and hips width apart. Toes facing the bottom of your mat so that you are saqare. Tip your chin slightly towards your chest to close your DENS POINTS (the little gap at the base of your skull, go on have a feel for it!) this now means your neck is in line with your spine.
Arms by your sides, palms to the ground.
Engage your core - belly button draws towards your spine.
You can also engage your pelvic floor here too - sucking up inside for that feeling of stopping yourself peeing/pooping!
As you do this press the full legth of your arms into the mat (keep the shoulders down) and ground into your feet - more pressure on the sides of the feet, equal pressure toe to heel. This is to prevent swaying ankles and promote ankle strength.
Push your hips to the sky. You are using your ABDOMINALS, CHEST, LEGS AND ARMS for this movement. Your butt (glutes) will engage, but it is not this set of muscles that are lifting you, so be sure of that!
INHALE to rise / EXHALE to lower. On the lower ensure to release and completely relax the muscles. REPEAT 10 TIMES (Rememeber 1 inhale + 1 exhale = 1 round!)
PROGRESSIONS/MODIFICATIONS:
Modification - We nensure our knees don't knock in, you an do this in a couple of ways:
1) If you have a block, place this between the knees - but make sure the block is turned to the width as wide as your hips and squeeze into the block. Alternatively if you don't have a block use something similar - a rolled up towel, a football or a book.
2) if you have a small and tough resistant band pop this around the thighs and pull the legs away into the band.
Progression: There are a few progressions for this pose you can try for various impact on different body parts:
1)
Take the arms out wide inline with your shoulders, keep palms to the ground. This helps broaden and open the chest more.
2)
Using the arms with the breath on your inhale as you rise take the arms back over your head to rest on the mat behind you.
You can do this in breath - INHALE RISE AND TAKE THE ARMS BACK / EXHALE LOWER BRING THE ARMS BACK TO YOUR SIDES.
This will really get you to focus on your breath and the lengtth of your inhale/ exhale.
OR...
Inahle rise take the arms back.
Staying up take 3 deep inhales/3 long exhales and on your fourth round lower bringing your arms back to your sides.
This opens the chest and expands the side body if you really reach o the top of your mat
3)
With your arms by your sides
INHALE to rise, squeeze the skapulars (shoulder blades together) and clast the hands. Wiggle to lift the hips hgher. This will strengthen your shoulders opening the chest.
Take 5 rounds of breath before lowering. Repeat this 5 times.
4)
Chosing whatever position you want with your arms you can start to work the feet.
Press into the balls of the feet, concentrating on grounding the big toes.
Lift the heels.
Rise and lower the heels 5 - 10 times. Inhale to lift he heels, exhale to lower.
This starts tto mobilse the ankles, achillies and strenthen them as well as the calves.
5) Lastly we can add some balance.
Inhale to raise the hips, press firmly into your feet.
Transfer the weight onto the right foot to extend the left foot to the sky.
Imagine a string attatched to your big toe being pulled up.
Feel the pressure of your rightt foot intto the mat, the lengthening of your left leg.
Take 5 round of breath and lower yourself back to the floor keeping the left leg extended, then lower.
Find your starting position and repeat on the other side.
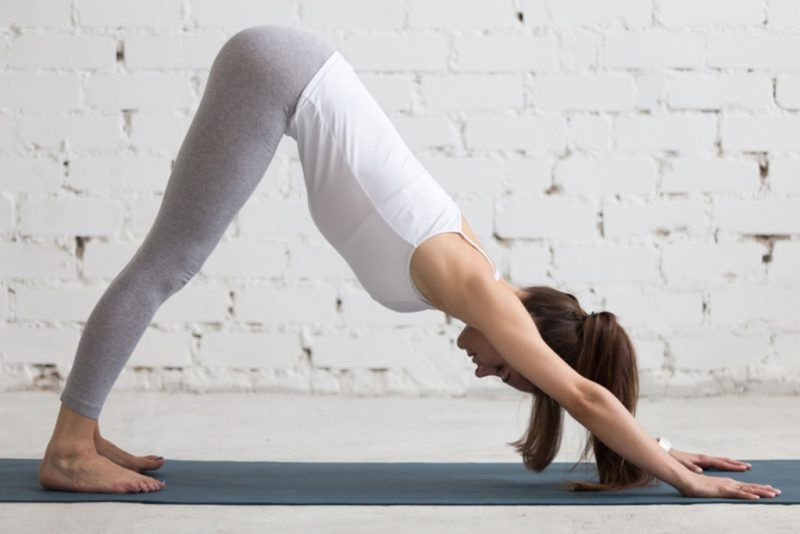
6. DOWNWARD FACING DOG POSE: Adu Mukha Svasana
The classic yogi asana, and quite often 'restoritrive pose'. Downward facing dog is a briliant one with so many benefits and modifications to really get into the corners of your body that need some attention.
The classic Downward facing dog will help centre your mind, create space within your body and promote deeper more calming breath.
If you suffer from sore or stiff wrists you may want to roll up the end of your mat, or place a rolled up towel in front of you to support yourself. Alternatively, scroll down for the progressions and perform DOLPHIN POSE instead.
Start in all fours.
Push back to put pressure onto the balls of your feet and allow the knees to lift from the mat.
Press into your hands to lift your tailbone to the sky. Imagine here you have a rope around your hips, someone is pulling on it to lift you.
Keep that tension of the rope but start to let your heels lower. Your heels do not need to coke all the way to the floor and your knees to not need to be straight. If that is avaialble to you then go for it, but the intetntion here is to have your hips as high as possible creating a straight line from your tailbone to the crown of your head.
Externally rotate your shoulders to feel your back and across the back chest widen.
Inahle feel lifted, exhale press your chest towards your knees.
You will feel your stomach hollow as you breate, this is exactly what you are after.
Stay in the position for as many breaths as you can. If it becomes too much or you experience light-headedness, bend the knees and come to child's pose.
MODIFICATIONS:
There are a few things you can play around with in Downward Facing Dog, the main thing in this pose is to let your body move how it wants to:
1) Walk the dog
Step through the feet one foot at a time, as though you have gum on your heels.
The balls don't leave the ground, you just bend and straighten (within your range of movment) each leg.
You can allow the body to twist and turn as it wants to too, if that feels good.
2) Bending both knees together
This will help you work into the pose a litle deeper, stregthen the ankles and gain more mobiliy through the achilles and feet.
Inhale push into your dog, exhale slowly bend the knees at the same time to come to just above the mat.
You may want to use the block/ ball/ towel inbetween the thighs here.
PROGRESSIONS:
PROGRESSION 1) THREE LEGGED DOG / 3 LEGGED DOD WITH HIP ROTATION

THREE LEGGED DOG:
In your Downward Facing Dog, extend one leg. Keep the hips square.
This is not about height but extension. Imagine someone pulling your foot.
Press into the hands. Deep breaths.
THREE LEGGED DOG WITH HIP ROTATION:
Sometimes it i snice to open the hips here.
Bend the extend leg and allow the body to turn taking the leg over the body.
If your right leg is extended, press the right hip towards the ceiling and vice versa.
PROGRESSION 2) DOLPHIN POSE: Ardha Pincha Mayurasna

Although technically a pose in its own right, Dolphin uses the same principles as Downward Facing Dog, so I have put it as a progression. For some it will be a progression as it can be quite heavy on the shoulders (especially if you perform it incorrectly) but for others, especially those with wrist issues, it is their prefered choice.
Start in all fours.
Bend the elbows to come to the forearms. You may need to move the arms out slightly in front of you depending on the length of your forearms.
Just as you did for Downward Facing Dog, push back into the balls of your feet, bending the kneeslifting them from the mat.
Again, allow that imaginary rope to pull your hips to the sky.
If you need to, walk your feet a little closer towards yourself, and have a sense of pressing the heels to the floor. They probably wont meet the floor but if they do, let them go! if they don't it is the same principle as Downward Facing Dog - tailbone high, knees can be slightly bent.
The main difference here is that you really need to concentrate on pressing into your forearms and OUT OF YOUR SHOULDERS.
Make space between your shoulders and your ears.
Deep breaths here.
Squeeze the shoulder blades together to expand the chest as you inhale to the base of your lungs, and press into the forearms as you exhale.
As well as a really great connected breath, you will start to feel your arms and shoulders working, and the hamstrings/ calves stretching.

7. CHAIR POSE: Utkatasana
A wonderful pose I often repeat throughout my classes to open the chest, strengthen the legs, really ground the body and set intention. This is. real FOCUS pose drawing our attention to the whole body, one part at a time.
Stand in Mountain pose (Tadasana) - feet a foot width apart, neautral spine (imagine the pelvis as a bowl of water, you do not want to spill forwards or back).
Roll the shoulders back, slight external rotation for the palms to face forward.
Gentle bend in the knees.
Now bring focus to your feet. Even weight toe to heel. More pressure on the outsides of the feet to lift the arches. We are wanting to prevent the rolling in of the ankles, we are aiming to strengthen the feet tto help with posture and back pain caused by an irregular gate.
Start of with hands on hips or in prayer.
Bend the knees, engage the core and drive the sitbones to the floor, as though you are about to sit on a chair.
Although weight is even front to back of the feet, we lift the chest and press the shoulder blades together to open the heart so a little more pressure in youer heels may be required whilst you get familiar with the pose.
Hold here for 5-10 rounds of breath.
As you inhale really imagibe the chest opening and lifting to the sky. As you exhale do not fold or collapse, keep that height and press into the feet.
Start to use your glutes. Keep cheking how your feet are feeling in the mat, this is your foundtation, keep it strong and stable.
MODIFICATIONS:
1) As with the Bridge pose, we want to prevent the knocking knees and rolling ankles, you can again use the block, ball, towel in between the thighs to press against, or the resistance band to push against.
2) Arms act a a lever in this pose, so it is alwats best to start with hands on hips, progress to prayer and once you are feeling comfortable you can take the arms up. You really want EARS IN ARMPITS so make sure your chest is lifted, as the arms can really weigh you down.
PROGRESSIONS:
Chair pose is a lovely one to play around with and modify...
1) Move with the breath.
Start in Tadasana (Mountain pose)
INHALE take the arms overhead and reach for the sky.
EXHALE bring the arms to prayer and bend into chair pose
Take one round of breath (1 inhale/ 1 exhale)
On the Inhale press into the feet, lengthen the legs abd reach for the sky to repeat this little sequence 10 times.
If the thighs start to burn uncomfortably, from your chair pose allow the body to forward fold and hang for a few breaths. Use your inhale to bring you back up.
2) Chair/Swan Dive
Start in Tadasana (Mountain pose)
INHALE take the arms overhead and reach for the sky.
Keep the arms up as you bend into the chair ON YOUR EXHALE
Stay in this position tto inhale - reach to the sky and open your chest
On your exhale swing the arms behind you, reach to the back of the room.
Keep gaze to the top of your mat so that the neck is inline with the spine.
Keep a flat table top back.
Repeat the sequence 5 times.
VINYASSA FLOWS
Below are two mini flows I have recorded that include the poses mentioned above, along with some others to try for yourself.
Take your time.
Breathe.
Stop if you need to.
Listen to your body.
REMEMBER: Yoga is not about 'perfecting a pose' it is about feeling the pose.
I will be retunring to this subject with R E C O V E R Pt2. which will be focusing on breathwork and breathing techniques.
Please take care of yourself. Look after your health. Reach out anytime you need to.


Comments